WSO2 ESB Worker Manager Cluster without a Load Balancer
INTRODUCTION
In production environments, services are clustered in order to scale up applications, achieve high availability or to achieve both. By scaling up, the application supports a larger number of user requests and through high availability the service is available even if few servers are down. To support balancing of load among these servers, a load balancer is used to distribute requests among the nodes in the cluster. The nodes that receive this incoming traffic are a set of backend worker nodes in a worker/manager separated cluster.
The worker/manager setup clearly separates the concerns/responsibilities, where the manager node is responsible for management related activities such as creating, updating and deleting synapse artefacts. The workers are responsible for serving client requests.
In this article I will elaborate the steps required to create a WSO2 ESB worker manager cluster without a load balancer. In a production setup load balancer becomes handy, but for our testing purposes we may not need a load balancer which fronts the nodes in the cluster. Instead we may straightaway direct the requests manually to the worker nodes in the cluster.
WORKSHOP
Having said that let me take you through the configurations necessary to set up the cluster. The deployment diagram which we are going to implement is depicted below.
- Deployment Diagram
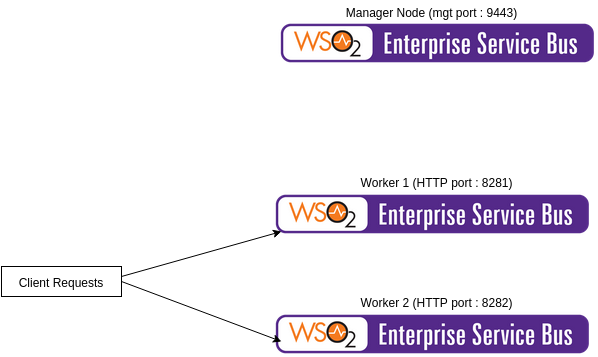
Figure 1 : Cluster Deployment Diagram
You may download the WSO2 ESB 4.9.0 from here [2]. For further information on clustering WSO2 products, I recommend you to go through WSO2 clustering guide documentation [3].
2 Setting up user management and registry databases
- Open a mysql shell and create a database as follows
- Create database schema and populate tables as follows. Make sure to replace CARBON_HOME with the absolute path of wso2esb directory
- Now, create another database which will be used as the shared governance and configuration registry database.
- Create registry database schema and populate tables as follows. Make sure to replace CARBON_HOME with the absolute path of wso2esb directory
3 Setting up WSO2 ESB management node
- Unzip wso2esb-4.9.0.zip into a directory in your local file system. Let the extracted directory be WSO2_ESB_MGR_HOME
- Go to WSO2_ESB_MGR_HOME/repository/conf and open carbon.xml. Update the following elements
Make sure to replace SvnUrl, SvnUser and SvnPassword according to your SVN server.
- Configure user management database and shared registry database by editing WSO2_ESB_MGR_HOME/repository/conf/datasoruces/master-datasources.xml as shown below.
Make sure to replace username and password with your mysql database username and password
- Update WSO2_ESB_MGR_HOME/repository/conf/user-mgt.xml as shown below
- Configure shared registry database and mounting details in WSO2_ESB_MGR_HOME/repository/conf/registry.xml as follows
This contains all the registry mounting details for configuration and governance registries. For more information please refer the clustering guide [3].
- Open WSO2_ESB_MGR_HOME/repository/conf/axis2/axis2.xml and update the clustering configurations as shown below
This members section says that the well known address (wka) member of this node is the member which holds the given IP address and listens on the port 4200. This member will send a cluster message to the wka member when this node joins and leaves the cluster. Also make sure that you give the IP address of the node here. For more information regarding the wka members please refer the WSO2 carbon based products clustering guide [3].
- Uncomment and edit WSDLEPRPrefix element under org.apache.synapse.transport.passthru.PassThroughHttpListener and org.apache.synapse.transport.passthru.PassThroughHttpSSLListener in transportReceiver configurations in WSO2_ESB_MGR_HOME/repository/conf/axis2/axis2.xml as shown below
- Then locate the local member host element and set it to your IP address as follows. Also take a note that you must give the IP address of the host machine here.
- Leave the local member port element to default as follows.
- Copy mysql jdbc driver (mysql-connector-java-5.1.19-bin.jar) to WSO2_ESB_MGR_HOME /repository/components/lib
- Copy svnkit library (svnkit-all-1.8.7.wso2v1.jar) [4] to WSO2_ESB_MGR_HOME /repository/components/dropins
- Now, start WSO2 ESB manager node by running
WSO2_ESB_MGR_HOME/bin/wso2server.sh -Dsetup
Upon a successful startup you may notice the following log printed in ESB console.
INFO - MemberUtils Added member: Host:192.168.1.100, Remote Host:null, Port: 4200, HTTP:-1, HTTPS:-1, Domain: null, Sub-domain:null, Active:true
INFO - HazelcastClusteringAgent Hazelcast initialized in 1283ms
INFO - HazelcastClusteringAgent Local member: [03fa03f7-176b-48d5-9173-48866d7dd641] - Host:192.168.1.100, Remote Host:null, Port: 4100, HTTP:8280, HTTPS:8243, Domain: wso2con.domain, Sub-domain:mgt, Active:true
INFO - HazelcastClusteringAgent Elected this member [03fa03f7-176b-48d5-9173-48866d7dd641] as the Coordinator node
You may access the manager nodes Administration web console via the following url.
The next step is to setup the Worker nodes for the cluster.
4 Setting up WSO2 ESB worker node
- Unzip wso2esb-4.9.0.zip into a directory in your local file system. Let the extracted directory be WSO2_ESB_WORKER_HOME
- Go to WSO2_ESB_WORKER_HOME/repository/conf and open carbon.xml. Update the following elements
Make sure to replace SvnUrl, SvnUser and SvnPassword according to your SVN server
- Configure user management database and shared registry database by editing WSO2_ESB_WORKER_HOME/repository/conf/datasoruces/master-datasources.xml as shown below
Make sure to replace usename and password with your mysql database username and password
- Update WSO2_ESB_WORKER_HOME/repository/conf/user-mgt.xml as shown below
- Configure shared registry database and mounting details in WSO2_ESB_WORKER_HOME/repository/conf/registry.xml as follows
- Open WSO2_ESB_WORKER_HOME/repository/conf/axis2/axis2.xml and update the clustering configurations as shown below
Here we configure the wka member for this worker node as the manager node, by specifying manager’s ip address and the port to which manager listens. Ideally in a production setup each node should register with two wka members, so that if one well known member is down still the node can communicate with the other wka member. That kind of a setup is not vulnerable to any single point of failures of well known members. But for the time being let’s have only one wka member since this is not a production setup.
- Uncomment and edit WSDLEPRPrefix element under org.apache.synapse.transport.passthru.PassThroughHttpListener and org.apache.synapse.transport.passthru.PassThroughHttpSSLListener in transportReceiver configurations in WSO2_ESB_WORKER_HOME/repository/conf/axis2/axis2.xml as shown below
- Copy mysql jdbc driver (mysql-connector-java-5.1.19-bin.jar) to WSO2_ESB_WORKER_HOME /repository/components/lib
- Copy svnkit library (svnkit-all-1.8.7.wso2v1.jar) [4] to WSO2_ESB_WORKER_HOME /repository/components/dropins
- Now, start WSO2 ESB manager node by running
WSO2_ESB_WORKER_HOME/bin/wso2server.sh -DworkerNode=true
At successful startup this node will send a cluster message to it’s well known (wka member) which is the manager node. You may see the following log printed in manager (wka) node’s console when this worker node joins the cluster.
INFO - WKABasedMembershipScheme Member joined [057c1105-97b2-4c99-8b1d-4164127b5684]: /192.168.1.100:4200
5 Setting up another WSO2 ESB worker node
Now let set up another WSO2 ESB worker node to this cluster. This is very easy.
- Take a copy of the previously created ESB worker node. Alternatively you may follow all the steps indicated in section 4 to create another worker node from the scratch. Despite of the method you choose here, make sure to apply following configuration changes to your setup.
- Locate the WSO2_ESB_WORKER_HOME/repository/conf and open carbon.xml. Then change the following element
- Open WSO2_ESB_WORKER_HOME/repository/conf/axis2/axis2.xml and update the clustering configurations as shown below
- Copy mysql jdbc driver (mysql-connector-java-5.1.19-bin.jar) to WSO2_ESB_WORKER_HOME /repository/components/lib
- Copy svnkit library (svnkit-all-1.8.7.wso2v1.jar) [4] to WSO2_ESB_WORKER_HOME /repository/components/dropins
- Now, start WSO2 ESB manager node by running
WSO2_ESB_WORKER_HOME/bin/wso2server.sh -DworkerNode=true
Note that we have specified two well known (wka) members (manager and worker1) for the worker2. Therefore when this starts you may see the member joined log on both manager and worker 1 ESB consoles.
In manager node’s console you may see following logs when the worker2 node joins the cluster
[2015-09-14 11:31:44,162] INFO - WKABasedMembershipScheme Member joined [a0f1c3cd-adaf-4fdf-ac9f-d6c6f3508022]: /192.168.1.100:4300
[2015-09-14 11:31:46,230] INFO - MemberUtils Added member: Host:192.168.1.100, Remote Host:null, Port: 4300, HTTP:8282, HTTPS:8245, Domain: wso2con.domain, Sub-domain:worker, Active:true
In worker1 node’s console you may see following logs when the worker2 node joins the cluster
[2015-09-14 11:31:44,163] INFO - WKABasedMembershipScheme Member joined [a0f1c3cd-adaf-4fdf-ac9f-d6c6f3508022]: /192.168.1.100:4300
6 Testing the Cluster setup
Now let us go ahead and test our cluster setup.
- Go to WSO2_ESB_WORKER_HOME/samples/axis2Server/src/SimpleStockQuoteService and execute following command to install Simple Stock Quote Service to our Axis2 backend server.
ant
- Then access the the web based management console of the manager node, via the following url.
- Copy the following proxy configuration to the manager node’s source view
- Then save the following getQuote request payload into a file named getQuote.xml
- Then move on to the place where you have saved the above payload and enter the following curl command to send a request pointing the worker node here. The first request points to the worker1 whereas the second request points to the worker2. You may use either of them to test the cluster setup.
curl -v -d @getQuote.xml -H "Content-Type: text/xml; charset=utf-8" -H "SOAPAction:urn:getQuote" http://esb.wso2con.com:8281/services/ClusterTest
curl -v -d @getQuote.xml -H "Content-Type: text/xml; charset=utf-8" -H "SOAPAction:urn:getQuote" http://esb.wso2con.com:8282/services/ClusterTest
- If you need to setup a cluster with a load balancer (Nginx) in front, you may use the article [5]. In such a case you have to direct your client requests to the load balancer. Just use the load balancer’s port instead of the worker ports used above.
CONCLUSION
In this section I have given you a brief introduction to clustering WSo2 Carbon based products. Then we set up a WSO2 ESb cluster with one manager and two workers. Finally we tested our cluster with a simple synapse configuration. Now we have our cluster setup in our hand. In my next article I will use this cluster setup to explore the Message Processor Coordination support in WSO2 ESB.
References


Comments
Post a Comment